
U-Roast-It Coffee
Aerobie Aeropress
Made from BPA free plastic, this handy device makes an 8oz cup of coffee. Simply add more or less water depending on if you like your coffee stronger or not.
Great for on the go or at the office.
The article below comes from Home Grounds (homegrounds.co):

What does the soft ride of your car and the smooth flavor of coffee have in common? For most brew methods, the answer is nothing, but if you use an AeroPress brewer then the answer is hydraulics (stay with me now).
The AeroPress is the brainchild of professional inventor and real-life MacGyver, Alan Adler. Invented in 2005, the AeroPress is a unique and refreshing take on personal brewing.
With your finely toned and coffee-saturated muscles as the driving force, the AeroPress uses a simple hydraulic cylinder to forcefully persuade the flavor out of your ground coffee beans.
If you are accustomed to the standard drip method for brewing coffee, all this Aero-jargon may seem quite strange.
You may be asking yourself how does it work, or why does it taste better, so, today, I’m going to go over the step-by-step process. However, instead of focusing on the instruction manual’s method, I am going to go over how to make an inverted Aeropress, and I’ll tell you why in just a bit.
What You’ll Need
You'll need your Aeropress parts, some coffee beans, a grinder and a gooseneck kettle.
Despite the complex connotation “hydraulic cylinder” brings to mind, the AeroPress is a fairly straightforward device.
It only has a couple more parts than a pour-over brewer, yet, with a nice set of opposable thumbs, you will be able to handle the challenge.
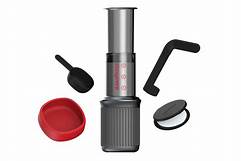
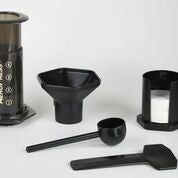
Here’s a list of all its different Aeropress parts:
- The plunger (top cylinder), which has a rubber cap on one end to create an airtight seal.
- The chamber (bottom cylinder), where the coffee grounds and hot water is poured.
- The filter cap, where you place the filter, and which screws onto the bottom of the chamber.
- Filters, which I shouldn’t have to explain.
- A funnel, to make life easier.
- A scoop, to measure out the right amount of coffee grounds.
- And a stirrer, to, you know, stir.
The plunger, chamber, filters and filter cap are basic necessities, but you can use your own measuring scoop and stirrer. All that matters is that you maintain some level of precision and consistency.
Don't forget your kettle (use a gooseneck spout for best results), your coffee beans and your grinder!
Step by Step Instructions
Although Mr. Adler was creative enough to invent the AeroPress, his intended brewing method isn’t the most flavor efficient. Just in case you want to try it out for yourself, you can find his method here.
The three big problems with his method are:
- Pouring the grounds and hot water on top of the filter allows some under-extracted coffee to drip into your cup.
- Your grounds need longer than 10 seconds - about 1 ½ minutes - to properly steep in the hot water.
- Using Adler’s method, the bloom, which is the thin layer of foam that is rich in aroma and flavor, is lost when it is pushed through the puck of grounds sitting as the bottom of the chamber.
However, thanks to the ever-critical minds of fanatical baristas, a solution has been found. This solution, the inverted AeroPress method is still very simple, and only requires a little more time than Adler’s.
But don’t just take my word for it, check out MacGyver himself using the inverted method to make “the best cup of coffee in the world.”
Step 1 - Measure and Grind

If you’ve read any of my other “how-tos” then you’ve probably caught onto the pattern.
If you haven’t, then here it is: always grind your coffee right before you brew.
Pre-ground coffee loses its flavor the longer it sits, so it is best to grind only what you plan on brewing.
To that point, you typically want your coffee-to-water ratio at 1/16. With the Aeropress, that is about 17g of coffee, or roughly 1 ½ Aeropress scoops.
Step 2 - Warm Up and Rinse Your Aeropress


Now, use hot water to rinse the Aeropress filter and warm up the chamber. Not everyone is convinced how important this step is, so I’m just going to say it isn’t entirely necessary. However, it removes any “papery” flavors from your coffee - and pre heats your Aeropress.
Why have a good coffee when you can have a great coffee? Go the extra mile.
I also like using the hot water to warm up my mug. Doing this helps to keep my coffee hotter for longer.
Step 3 - Some Assembly Required
Next, take the plunger and push the rubber end into the smooth end of the chamber, but don’t push it all the way in, just the tip (grow up).
You want the plunger pushed only a finger’s width into of the chamber.

Now place the AeroPress on a solid surface with the open end of the chamber facing up, but make sure that you have a good seal between the chamber and the plunger, because…
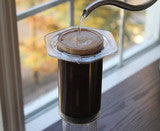
Step 4 - Add Coffee and H20
Heat your water to about 195ºF. If you’re not as meticulous as I and you don’t have a thermometer, then bring your water to a boil and let it cool for about 45 seconds.
Place the funnel on top of the AeroPress, and then dump in your coffee grounds, and now you can pour in your water.

Yes, that odd looking black thing is actually a funnel

The Aeropress funnel helps you get your grounds in with losing any goodness
Carefully pour around the sides of the funnel to wash down any extra grounds, and then steadily fill the AeroPress up to the bottom edge of the funnel.


Step 5 - Stir
Once you’re done pouring the water, remove the funnel and grab your handy, AeroPress-branded stirrer and get to stirrin’.
Stir for about 10 seconds, to ensure that all off the grounds get submerged, and a thick caramel colored foam should begin to form.

Next, pour in more hot water, until the chamber is filled to just below the rim. At this point, screw on the filter cap, and let the grounds steep for one minute.
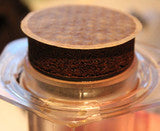
Step 6 - Savor the Bloom
Now that your coffee is done steeping, it’s time to get it out of your AeroPress and into your cup. Before you flip it over, there is one little trick to help savor your coffee’s flavor.
While the AeroPress is still sitting with the filter cap facing up, gently press down on the flat edges to push the delicious bloom - the foam layer on top of your coffee - through the filter.
You want the foam to just barely rise out of the filter cap, but be careful not to press down to far so as not to spill.
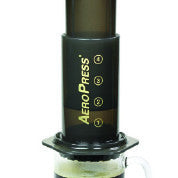
Step 7 - Push It
Next, turn your mug upside down and place it on top of the AeroPress.
Then, with one hand holding the mug and the other hand holding the AeroPress, carefully flip the whole setup so that your mug is now on bottom.
Once you’ve set it back down, keep one hand around the lip of the AeroPress - holding it in place on top of your mug - as you gently press down on the top of the plunger with the other hand.

(1)

(2)

(3)

(4)
When pressing on the plunger it is important to position your shoulders over the AeroPress, and use a moderate pressure to push the plunger down.
With just a little bit of force, the plunger will slide down the tube, but using too much force could cause the AeroPress to fly off..
Keep pushing and stop the moment you hear the hissing sound of escaping air.
Step 8 - Final Touches
After you are done pushing your coffee through the AeroPress, there is only one final step (which is entirely optional) between you and your delicious coffee.
What’s in your mug right now is extremely concentrated, so take what’s left of your (hopefully) still hot water, and, in small increments, use this to dilute the coffee in your mug. You will only need a little, so be careful not to drown your coffee.
This step is dependent on your personal taste, so I recommend taking the time to experiment a little.
Finally, once you’re done adding a few splashes of hot water, you can now sit back and enjoy a great tasting cup of AeroPress coffee!